Making an AwesomeWM Widget
Is this complex? No. Did I learn something from this? Yes!

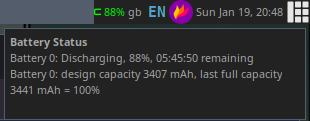
Awesome is a window manager wrote in lua. For some context, the base installation of awesome doesn’t come with bells & whistles. I was using this on my laptop & realised I had no way to see what battery percentage I was at, so why not see if I can implement it myself?
I’ve never really messed around with the wiibar before in AwesomeWM so I’m creating a really basic one which just outputs the percentage, a UTF8 charcter and changes the colour of the text.
This guide explains how to create custom widgets in AwesomeWM, using the battery widget mentioned as the practical example:
Basic Widget Structure #
1. Required Libraries #
Every widget typically starts with importing necessary libraries:
local awful = require("awful")
local wibox = require("wibox")    -- Widget framework
local naughty = require("naughty") -- Notifications

-- For the sake of our widget we need the UTF8 library
local utf8 = require("utf8")
2. Widget Creation #
Widgets are created using wibox.widget. The basic structure involves:
- Creating a container widget
- Defining widget components
- Specifying the layout
local my_widget = wibox.widget({
    {
        id = "icon",
        widget = wibox.widget.textbox,
    },
    {
        id = "text",
        widget = wibox.widget.textbox,
    },
    layout = wibox.layout.fixed.horizontal, -- Since we want them side by side
})
3. Data Storage #
Store static data (like icons, colors) in tables for easy access and modification:
local battery_icons = {
	[100] = utf8.char(0xf240), -- Full battery
	[75] = utf8.char(0xf241), -- Three quarters
	[50] = utf8.char(0xf242), -- Half
	[25] = utf8.char(0xf243), -- Quarter
	[0] = utf8.char(0xf244), -- Empty
	charging = utf8.char(0xf0e7), -- Lightning bolt
	unknown = utf8.char(0xf128), -- Question mark
}

local colors = {
	charging = "#ffffff",
	good = "#00ff00",
	medium = "#ffff00",
	low = "#ff0000",
	unknown = "#ffffff",
}
Widget Logic #
2. Update Function #
Create a main update function that refreshes the widget’s display:
local function update_widget(widget)
    -- Get data (e.g., from system command)
    awful.spawn.easy_async([[command]], function(stdout)
        -- Parse data
        local value = parse_data(stdout)

        -- Update components
        widget:get_children_by_id("first_component")[1]:set_markup(
            format_data(value)
        )
    end)
end
How this looks for our battery:
local function update_battery(widget)
	awful.spawn.easy_async([[bash -c "acpi"]], function(stdout)
		local first_line = stdout:match("^[^\n]+") -- Only need first battery, for some reason external monitor shows up
		local status, percentage = first_line:match("Battery 0: ([%w%s]+), (%d+)%%")
		percentage = tonumber(percentage) or 0
		local is_charging = status == "Charging"

		local icon = get_battery_icon(percentage, is_charging)
		local color = get_battery_color(percentage, is_charging)

		local charging_indicator = is_charging and " ⚡" or ""
		widget:get_children_by_id("icon")[1]:set_markup(string.format('<span color="%s">%s</span>', color, icon))
		widget
			:get_children_by_id("text")[1]
			:set_markup(string.format('<span color="%s"> %d%%%s</span>', color, percentage, charging_indicator))
	end)
end
3. Timer/Watch Setup #
Set up automatic updates using awful.widget.watch:
awful.widget.watch("acpi", 30, function(widget)
	update_battery(widget)
end, battery_widget)

update_battery(battery_widget)
Interactivity #
1. Click Handlers #
Add mouse click interactions, this lets us see the full information in our example:
local function show_battery_details()
	awful.spawn.easy_async([[bash -c "acpi -i"]], function(stdout)
		naughty.notify({
			title = "Battery Status",
			text = stdout,
			timeout = 5,
			position = "top_right",
			width = 300,
		})
	end)
end

battery_widget:connect_signal("button::press", function(_, _, _, button)
	if button == 1 then
		show_battery_details()
	end
end)
2. Hover Effects #
Add hover effects, this lets us change the mouse cursor for our example:
battery_widget:connect_signal("mouse::enter", function()
	local wb = mouse.current_wibox
	if wb then
		wb.cursor = "hand1"
	end
end)

battery_widget:connect_signal("mouse::leave", function()
	local wb = mouse.current_wibox
	if wb then
		wb.cursor = "left_ptr"
	end
end)
3. Notifications #
Add notifications for important events:
if percentage < 15 and not is_charging then
    naughty.notify({
      title = "Battery Low!",
      text = "Battery level is " .. percentage .. "%\nPlease connect charger",
      timeout = 10,
      position = "top_right",
      bg = "#ff0000",
      fg = "#ffffff",
      width = 300,
    })
end
Integration #
Add the widget to your wibar in rc.lua:
s.mywibox:setup {
    {
        layout = wibox.layout.fixed.horizontal,
        my_widget,
        -- other widgets...
    },
    -- ...
}
This structure can be adapted for creating various types of widgets like CPU monitors, network status, volume controls, etc.
The world is your limit, just build stuff & have fun!
The source code for this basic widget can be found here.